BIKE ID KIT + Application Guide
Congratulations on purchasing a BIKE ID KIT +

ONE
SHIELD APPLICATION
Apply the VAULT Shield warning label in a prominent location on either the frame seat tube post, top tube, down tube or head tube.

BIKE ID LABEL APPLICATION
Carefully peel the BIKE ID label from the backing material ensuring the laser-cut letters and numbers remain on the label backing. Apply the label to the underside of frame near the serial number, or low down on the seat tube post.

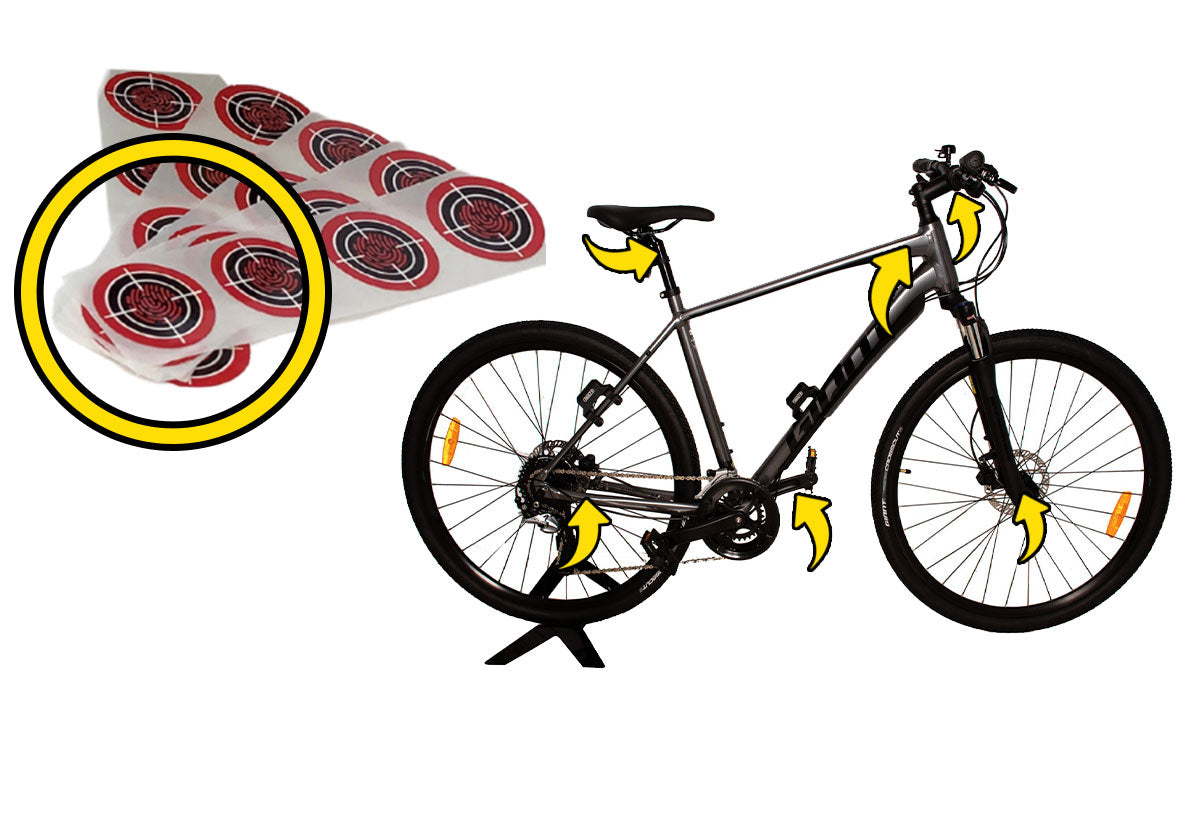
MINI ID LABEL APPLICATION
Apply the 8 Mini ID labels to discrete areas of the bike.
Placement suggestions:
BULLSEYE MARKER APPLICATION
Lightly apply the Bullseye Marking Rings to discrete locations ready for microdot application.

PREPARING DataDOTDNA® MICRODOTS
- Place the microdot applicator on a flat surface and tip out microdots evenly across the tray.
- Dip the applicator tip lightly into the glue vile and then using the tip collect some microdots from the applicator tray.

DataDOTDNA® MICRODOT APPLICATION
- Dab the applicator tip with collected microdots onto the middle of the marking ring, transferring the microdots to the bike.
- Immediately after applying, take a photograph of where the microdots are applied and then remove the marking rings before the adhesive dries.

TAKE PHOTOGRAPHS OF YOUR BIKE
Take the following photographs and upload them when you register your bike:
REGISTER YOUR BIKE & LOCK YOUR BIKE ID
- Go to www.bikevault.com.au and create your free member account.
- Click the 'ADD TO VAULT' button and follow the prompts to register your bike.
- Enter the PIN code found on your BIKE ID label surround in the field provided to enable the upload of 20 photographs and to lock the ID to your bike. Note: Extra photo boxes display once all existing boxes are filled.
- Follow the field prompts to complete your bike registration.
THINGS TO KNOW BEFORE APPLYING YOUR BIKE ID KIT+
DataDotDNA®
DataDotDNA microdots are designed for covert fitment and are not recommended for application to highly visible or aesthetically important areas. If you inadvertently apply the adhesive to an area that you wish to remain clear of marking, wipe immediately with a damp cloth.DataDotDNA microdots are applied using a water-based containing a fluorescent additive and DataTraceID providing an extra layer of invisible ID. The adhesive when first applied is white in appearance and dries clear. Do not dilute the adhesive. Do not store or apply the adhesive in extreme hot or cold temperatures and only apply a small amount to each marking area. The adhesive becomes touch dry after 1 hour and is completely cured within 72 hours. After application, wait 4 hours before riding your bike.
Lightly apply the Bullseye Marking Rings for easy removal after application and photographing.
BIKE SECURITY LABELS
The BIKE ID labels are delicate before application and can only be applied once. Any attempt to remove the labels once applied will cause them to break.The BIKE ID labels have a special fluorescent acrylic adhesive designed to penetrate the surface coat of painted/clearcoat substrates and leave a UV detectable trace (UVT) visible by black light. Ghost ID is created by laser cutting the ID on the QR code label. Best UVT results are achieved after 14 days. Some surfaces may resist UVT. UVT will not perform on e-coat surfaces, plastic, uncoated aluminium, steel and carbon fibre.